3D modelling level 3
3D modelling induction
This unite I will be using Maya to construct a 3D modelling of a builder that I have photographed as will as do research into 3D modelling.
what are UV
UV's are 2D texture surface of the 3D model which can be place onto the the surface of the 3D object.But UV's are mainly coordinates very similar on how X,Y and Z are used to detail 3D environment but UV 2D texture coordinates that correspond with each vertex information for your geometry.UV link the surface mesh and how the texture get applied to the surface this is what make them vital.UV act as a marker point in which it control which pixel should go on the texture corresponding.

0-1 UV SPACE
0-1 UV spacing is the UV map grid U being used as the horizontal and v being used as the vertical.the main working are of the grid is the 0,1 by default centre and this is were texture editor for the 3D object will be done.any texture done outside of 0,1 range will mean the texture will repeat and wrap around all the other grid square.it is best to work outside the 0,1 square if you are planning on repeating it if you are doing tile or fooling.

working outside the UV space
the default space for UV map is 0-1 grid anything outside could be wrapped and repeated although it is not recommended to work outside you can if are doing texture for flooring because it means that you can have the same base look without having to continue editing it.
UV software and methods
although Maya those have some UV editing there are other software such as Blender, Unlimited Unwrap 3D, UV layout and Unfold 3D there all for doing UV texture but each are different and have different interface
How to UV with Maya
when working with UV in Maya it is best to keep with 0-1 texture coordinate when doing texture unless you texturing the flooring or walls. avoid overlapping the UV shell only do this if you want the same texture another side of the 3D model. spacing between
Texture Maps
texture maps is the map of 2D surface from and 3D object that has been texture so that it can wrap around the 3D object and give it a surface texture.

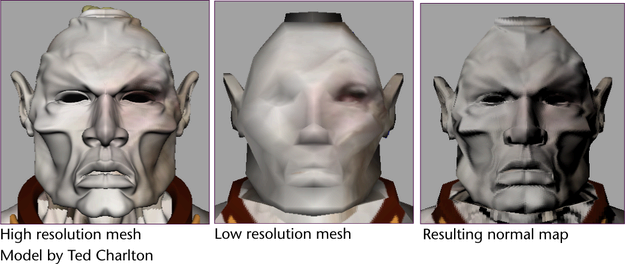
Transfer Maps
transfer maps is being to put the mesh from a high quality picture to low quality
Texture/ UV terminology
what modelling software is used for game?
Maya ,3Ds max design, mudbox and blender are 3D modelling software used by game industry fro developing games
what is high/low poly modelling
High poly is when a model's level of detail needs to be faultless and they are normally used by to generate maps on lower-resolution models.
low poly modelling is when a modeller sacrifice detail for a certain style but low poly modelling is for rendering perform.
what are polygons
polygons are used 3d modelling software and they are the surface also know as the mesh.they create surface by connecting points and create any shape.polygons are mainly made of vertices, faces and edges and when modelling with polygons they are normally use threes-sided polygons called triangles or four-sided polygons call quadrilaterals.

what are faces/edges/vertices
these refer to the polygons the face is the surface of the polygons the vertices is the corner and edges are the line that join the two vertices.
what is extruding
extruding is the process of stretching a flat 2D to make it into a 3D object , this is simple method to create 3D object from a 2D surface.

what is bevelling
bevels is the process of making the edge of 3D object in a new face by rounding the edge of a polygon mesh.

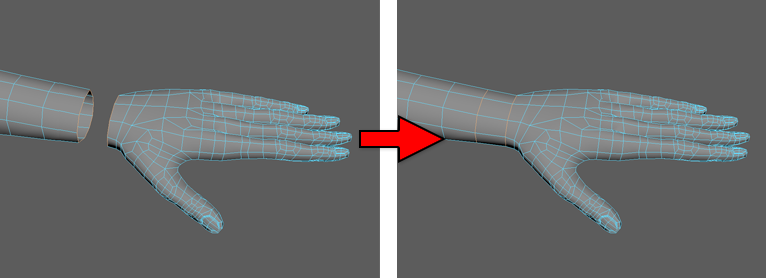
what is bridging
Bridge is command to construct faces between the border of edges to fill and gaps
what is ambient occlusion
ambient occlusion is the rendering in Maya and is a technique used in 3D computer graphics to calculated how to expose each object to a ambient light from an environment.

what are booleans
Boolean's lets you model with polygons by letting you combine shapes that would be difficult to model using other technique. this is done because Boolean's let add,subtract intersect objects to another objects.Boolean's have three different operation:
Union-This merges both objects together and it will get rid of geometry between the two pieces.
Difference-subtract the last selected geometry from the first selected geometry
Intersection-The geometry between the two objects will be kept and the rest will be removed.
This sheet show the User Interface for Maya

navigation of Maya
to start with a cube you first go to create on the menu slide and then go to polygon , unselect interactive creation and click the cub in the poly modelling shelf. you will get a even cubed shape in the middle of work space grid.to create the cube you want you go to create on menu slide then select polygon and click cube and you will get a widow called Polygon Cube Options in this you make the how large you want and even create the amount of division ion the square as you want.
Moving the camera
to move the came on you key board press alt and lift click which mean you can move the camera around the objects.to zoom the camera in and out press alt and right click, move you mouse up to zoom in and move you the mouse down to zoom out, you use the roller on the mouse the only different is with the roller your zooming the lens in and Finally alt and middle mouse click allow you to pan. also if you press space it will take into four camera view which give you view of the object from the top , slide and bottom as well as you free cam.
Moving the objects
on the Tool box there is a move tool but there is shortcut which is W, this will allow you move the object in different axes ,To rotate the shortcut key is E which allow to rotate the objects anyway, and to scale the shortcut is R so you can make object as big or small as you want. and to go back into object select press Q
Create a new project folder
before going into Maya create a Maya project folder on your PC or hard drive and in there create the project folder. In Maya go to the top left and select file and click project window, that will generate a file system in this you will see name on the side like scene and images,they will saved in these. but to save the project select new , name the project folder you want it in and make such that the location is selected to Maya folder and press accept.
save scene in the correct folder and opening prjects
when you finish with Maya you need to save it this is done by going into file and select save scene as and will going into the file which you created on PC for Maya and name it to what you want.To switch scene or projects go to set projects and it will open your Maya file with the other projects , select the one you want and when you back in Maya nothing will happen but go into open scene and will take you to the file you selected and open the project.this will allow to go between project with ease.
Grid setup for unreal

to start go into windows ,setting preference then preferences and go down to setting a window will appear and you selecting working unites to what you want but for unreal engine it is best to keep on centimetres. there are grid option on the panel bar one will let you make the grid disappear if your right click on you will the option called grid option click and a window will appear with all the options. Here you can change the grid to make it larger or smaller by changing the length and width fro grid line if you want match with unreal engine change it to every 10 unites and keep the subdivision to 1 and you will have the same Grid as Unreal engine.This is male any new cube you place appear smaller but real the gird has become bigger.
Nurbs and polys
Nurbs can be found on the shelf in the Curve/surface , in there you will find Nurbs sphere, cub eta
Polys can be found next to the Curve/surface.Polys have more detail than the Nurbs and they they are made of smooth surface were as the nubs curves around. Nurbs stand for non uniform rational B-splines this mean the surface of the objects will be neatly curved and this is good for organic modelling or getting the windscreen of a car because it has a smoother gradient. Polygons are more used in Game engines because game engines don't like the Nurbs also Nurbs don't have editable UV.

Create Project
To create New project select file and go to Project window and a small window will appear.Click new and name it then make sure the the location it set to your Maya Project folder and click accept.

Grid Setup
You need to make sure your Grid is the correct size by right clicking on the Grid option and select Grid options.Window will appear called Grid Options and make sure the units for length and width, grid line and subdivision are the correct for my can the length and width will be 100,000 units, the grid line will be 10,000 and subdivision to 1.This is also the standard size and is Aline to unreal engine.

Volume Guide
Volume Guide are reference that give you an idea on how big your space it

Import Image
Any Images you plan on putting on your Model should be saved and place into Maya folder and in the new project you made place your image into source image so Maya know that those are your reference image

CV Curve and Revolve
The CV curve tool will allows us to get the shape and structure of the can so we can used the revolve tool to turn it into a cylinder

Deleting Edge and History
using this allow us to delete edges by double clicking on one edge will select the edge that go's all around the object then Ctrl right click and select edge loop utility then click to edge loop and delete.this will delete the edge.

Incremental Saving
Incremental save are encase your file corruption and you can go back to one of these save encase of corruption or mistake.this is done by saving as and it will open your scene file.before save create a new folder then in the new folder name the scene and put in 0001.bt so you can save using shortcut key and it will create a new one with 0002.bt and it won't replace 0001.bt.

Smooth Shading Preview and Supporting Edge Loops
Smooth shading preview is is mode that can access by pressing 3 on the keyboard so that the edge on your model will appear smooth.1 is show object more sharp and pressing 2 will show both previews.More edge can be made to support object to make it smoother by using the multi cut tool and press ctrl and you can place more edge lines.

Fill Hole and Poke face
To fill the hole select the edge of the hole then click shift right click and go to fill the hole and it will fill the hole cylinder from all holes.

Extrude Tool

Problem solving- extra faces
extra face on model can cause a lot of problem it happens when you extrude but forget to pull. it fixed by deleting the surface of the face's were then select all the extra face delete them.i could then select two edge of the surface i delete and then bridge them.

Drag Select Face and Grow
This is will allow you to select face in view so you don't accidentally select any face you can't see by select drag in the tool kit and truing off camera base section this will allow you individual select faces faster then by clicking one by one.you can also tab or select drag so you can drag your moues and any face you go over will be highlighted.

Extruding Can Top
The extrude to can be acceded by pressing cltr+E and with the tool you create new face on the object and can extend the length or wight of the face to how much you want.

Working With Symmetry
Symmetry let you place detail on one side of your 3D object to the opposite side.so I could used this tool to create the lips of the can

Re-Topology
Re-topology is redo the edge line so for my can I used the drag to select all the edge line that all lead to the centre and deleted them.Then using the multi cut tool to create a grid on the top of my can.

Bevel Edge
The bevel edge tool is used to turn the edge into a new face and can be found on components section.The tool can be used curved edges with accuracy.

Can Top Opening Detail and Target Weld Tool
The target weld tools allow you to weld edges and vertex to other vertex and edges.t
Ring pull Create Polygons Tool
Ring pull Bridge
Ring pull Extruding
Ring pull Reverse
Finishing off the Model
UV wrap Process
UV Snapshot
Photoshop Texture
Maya Applying texture
Maya2018 Metalness
Image Based Lighting setup
Rendering
progress of modelling my building
Using my reference image I used box to get the shape of my building, but I also need a scale so I downloaded a 6 foot made figure and scale my reference image so that the door of the building is the correct size of my six foot man.Once I had the correct scale I could start blocking and next lesson I can do blocking for the side.

progress #2
For this i scaled the back of the blocks and i include more blocks which i used to connects the parts on my first progression.I add the main base of the building and made sure that the parts of my building were the right perspective.

Progress 3
For this i had the main base of my building which i added detail using the multi cut tool.with the multi cut tool i added edges to where the windows are located on my building then i extruded to get then then frame then push it in to the window.Then I went on to the side view first by keeping the blocks inline with my reference image.After that I added more block to the back end of my building, each block had different sizes but I could follow the outline by using the view that only show the edge line so the block dose not block the reference image.


final render
This is the result of building being render In Maya so you can view the model more clearly and see the version detail such a the windows and railing on the front.Each part of model was made from a different blocks and all detail like the widows one by using the multi cut tools then movie the face back to give the depth of a window.The multi cut to was also useful to create the curve that are found on the front of the model.

Evaluation
In this project I was task on creating a 3D of building of my own choices using the Maya 3D Program.But before doing the I learnt about Maya program by following a tutorial set up by my tutor, in the tutorial I learnt the various tool and how to use them.tools like the multi cut tool and evade tool.all these tool I learnt we used to help create a coke can.
During modelling of building I needed to choice a build to model. I needed one that was not be too difficult, was easy for me to access I can get some primary resource images, But was also a challenge to test my Maya skills.Once I found one I took picture of the front side and the back of the building and place them in the Maya for me to use a guide to help me to achieve the right size and place certain things in the right place.I used the picture of the side and back to model my building and while doing this I had to make sure that it did not affect the side of my model.The tool I found most useful was multi cut because it help to place detail and aspect like the windows.My main tool was extrude tool because i could used to make the aspect of of building structure into the correct size and I also used to extended parts out too create thing for like the railing.The difficulty I had while modelling was the font of the building because It was curved I did not have the correct means to find the exact curve angled. But I over came this by using the two side blocks as a point for the end parts to meet and then extended out the font and finally make it look more curved by using the multi cut tool. .Once I had finished my model I rendered it.
what I would have done differently is the pictures in a better angel because my front image was angled making difficult to get the correct size and location I needed when it came to doing aspect like the windows and railing.I also would have found away to get a better image of the back because the the image I have was angled so I could not use it as a guide line to follow.
Modeling assets


Comments
Post a Comment