games as art level 2
Timeline of games art
This is a timeline showing how the art of games have changed from 1961 to the present day (2016) using screenshot from game play.

Making Photoshop Brushes
27th September 2016
I used Photoshop to create my own shaped brush, first I set my brush to a low opacity and then I drew out my own shaped brush which I tested by using it to draw in a straight line or place on top of each other. The tools i use was a hard brush with low opacity, in addition i experimented with the brush the brush present to use any of style of brush. after that i save as one of the brush in the brush library.


Ink experiments for brushes
I use real life painting which I did on a large sheet of paper to create a shape which could be use a Photoshop brush. The ink I use was very thick which meant I could spread it out in different ways I also use a small stick so when I move the ink it would a pattern style line.The tool I was given where ink wooden brush, a toy car , back crayon and different size of paint brush.


silhouettes of create

The way this was done is i set my brush at a low opacity then i scribble on my sketch pad until a shape of a creature started to make form. The learn't the more free minded i was the more easy it was to make shapes and surprisingly please how the creature turn out and i was mostly proud on how all my creature have a unique figure. The only thing i would change is to change the blur texture on some of creature to make more solid.
Collage creature experiment

Collage creature experiment
In this i used Photoshop to create creatures, i first search for images organic creature which we then pasted into Photoshop after that i used the lasso tool to cut shape of the images.I cut random shape out which i use to create a creature style shape i also rotated and flip the shape to make in more creature like i use a size (Ctrl-t) to in large shape and the different layer to blend to make them look like they go together.The shape cutting was random because it made to visualise a creature if i was trying to plan one image my head. Most people voted for number 5 to be feature developed but i chose number 4.I chose this because i feel like i can do more with this that the rest and it look more like a creature


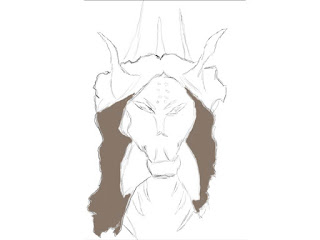
creature detail
I chosen a creature which I want to further detail with feature and I creature a new layer in which I shaded the shape of the creature i also use a the pencil tools to draw out the outline and place any other feature on my creature such as the eyes and horn.So far i pleased with the first layer the creature layer and with the small details. The only thing i would change is the brush i used so the paint would not go over itself.


Creature
Annotation Questions
Answer as fully as possible
1. How did you
come up with the design for your creature?
The way I come up for the design
of my creature is that I use Photoshop and cut out a random shape with the
lasso tool from an image I got from Google. Then I added small little details
to my creature such horns and wings by drawing them out and then I painted my
creature in the colour of the image I use to cut it out.
2. What did
you use to make the collage design for your creature?
to make my collage design I used Photoshop and Google images, first I
search for image that can be used as the creature skins and pasted it into
Photoshop then created a new page and them side by side in which I cut out
small parts of the image to creature something that looks like a creature.
3. What did
you have to do to change your collage into a design?
To make my collage into a design I first draw out a small outline for my
creature so I can make out detail such as the horn and the wings. Once I had
drawn out the outline in a new layer I started to paint my creature first by
using the image I cut out I used the eyedropper tool to select the correct
colour of the image in which I started to paint my creature with in my outline
layer. I set of opacity to 50% and I started to paint in the outline. Once I
had the first layer of colouring I went over it with a darker version to create
a second layer. After that I start to shad my create by constantly going over
my creature in a light and dark version of the creature colour.
4. What did
you like about your collage?
What I like most about my collage is that it is that it is a very
complicated creature, it more like a creature that my other collages.
5. What did
you like about your silhouette?
What I like most about my silhouette is that they can all be image as
creature and the small little line goes well with them.
6. How did you
make your silhouette?
The way I made my silhouette is I used Photoshop and I set my brush to a
low opacity then I started to draw randomly on my sketch pad until it started
to form a shape of a creature.
7. How did you
make your collage?
First I search for an image in Google which represent the skin of the
creature I want then I pasted it into Photoshop in which in which I cut out
random shape which I started in large and flip. After that I started adding
more parts until a creature like shape started to appear.
8. How did you
paint a metal effect on your creature?
I
use the same colour but a keep changing it into light and darken version and I
went over my creature
9. What
colours did you choose for your creature?
The colour I use on my creature is a green that can be found on leather
skinned creature and I add a small amount of red on the wings and chest.
10.
Why did you choose those colours?
I choose the colour green because the creature I create look like a
lizard style creature and most lizard are green but I did not want to make the
whole of my creature to be one plan colour so I add small coats of red.
11.
What software did you use to create your creature
work? The software I use the create my creature is Photoshop
12.
If you could do your creature again, what would you do
differently?
The only thing I would change is to increase the length of creature to make it bigger.
The only thing I would change is to increase the length of creature to make it bigger.
13. What do you like about your creature?
What
I like most is that my creature is not very complicated to make out and the
necessary look to be a creature.
14.
What do you not like about your creature?
What I
don’t like is that some parts of the creature look too small or are not big
enough.

The artist that develop this is called Guillem H. Pongiluppl he use a a soft brush the create the background a hard brush on the actual creatures and the reflection of light. He used more dark colours but there is small use of bright colours in a realism style.

This is a artist interpretation in a realism form i start off my by first painting it it out in low opacity because the outline was difficult to see.Once i had complete the painting the outline were easier to see so i went over them with size 1 hard paint brush.after that i shaded in more of the creature with the appropriate paint. Soon after i start to do the background i first start with the outline.
pen tool experiment one
This tool is know as the pen tool, the way it is used is it use anchor point to form a sort of outline. the first anchor point start off the pen tool when create a second anchor point a line will appear and can the two coming off the point curve the angle. You can Ctrl click to move the one of the lines so can move a certain side of the line and manipulate it


i draw a creature using the drawing the bone
the plate experiment is located on the left
Drawing skulls
 .
.


calligraphic
drawing without taking the pencil of the paper

detail drawing
final drawing with detail


My creature was first a amphibian until the water dried up and the it became
In the creature project i used both digital and tradition drawing in this project our first 2 piece of work i used Photoshop to create silhouettes of 10 different creature by drawing shape until a shape of creature appeared and i also used to create creature by cutting out different shape out of images to form a body of creature.the image i cut were used to represent the skins of a creature, i attache cut image into one whole body until i felt confident enough to call it a creature.
pen tool experiment one
This tool is know as the pen tool, the way it is used is it use anchor point to form a sort of outline. the first anchor point start off the pen tool when create a second anchor point a line will appear and can the two coming off the point curve the angle. You can Ctrl click to move the one of the lines so can move a certain side of the line and manipulate it

pen tool experiment two

I when over the shape in using the pen tool to see how it wokr and ton get use to it.


concept artist
long Ouyang
I like these artist because he use the sic fi aspect in he work and the background has a lot of vision to it.these also has a lot of detail such as lighting and musky of dirt to give that look of realism. I enjoy the use of sci-fi because it is something that can't images by the same person ,it is something unique and i to look more into to appropriate how he design it.


observational drawing of the hand


The first attempt at drawing i started doing it with faint lines to do the outline of my left hand.i didn't need to use a rubber because using the faint line mean't i can over the correct line in a dark stock instead of rubbing out any my mistake.
The second drawing i did with my left hand with has difficult but it turn out better then expected
The third drawing was even difficult because i used my chin to draw but i could not press down the pencil.
The fourth and fifth i use my elbow and knee it was tricky to because i would push too much down onto the paper which was difficult to draw straight
creature design

i draw a creature using the drawing the bone
the plate experiment is located on the left
Drawing skulls

i did observation drawing of a animal bone then i use the my drawing to create a creature. i chose the object because it had unique outline compared to the skulls and bone of the other animals.the contour i used only on the outline but for the detail i used a hard stroke. the plate experiment i used on my first attempt i could follow the line with my hand but i could not get the correct size of the line so some part where bigger than the other. but pate did help me because it made me focus on the object even more than normal.i found following the line of detail quit easy but the difficult part was getting the correct size. i would use this method on only if i drawing out small detail.


this is final completed version
observational drawing
contour line drawing
drawing the shape of the object first

calligraphic
drawing without taking the pencil of the paper

detail drawing
final drawing with detail

measuring in drawing

Using measuring in drawing help to draw 3D object in the correct size, it is like using a grid method for 2D picture. The way it is done is by using your pencil to to measure how big the object is by moving your pencil with thumb and then find out how many units the object takes both horizontally and vertically. then you keep your arm straight , rest you head on your shoulder and then place the tip of you pencil on a certain point and place your thumb to make a measuring point. in which your use to to creature a cross with point to use as measuring. then you can used this to draw a warping around the object to find the largest points which is used to sect the boundary.after that you sketch out the basic shape of the objects using the units of measurements and then finally you sketch in the details
Tone and value

Tone and value are the shading light that reflect on a object to dynamic of a 3D object. the shading is done by using a hard brush to use as shading , this need to be done in the same directional shape of the object so it does not look odd. after that i used a softer pencil to colour in the other shade that is further away from the light source. i used the softies brush to represent the dark shadow of where the light will not hit.
light style and direction


My group use the style of Jim ferria as in the aspect of the using one light to create a shadow for the top and bottom one. the first one light direction is coming from the top middle and the second one direction is from the bottom left to give it effect of large shadow. to show what the main point of object is.


creature back stories
My creature was first a amphibian until the water dried up and the it became
a desert. My creature adapted there skin in a shell to protected them from the sun and they live in the desert.
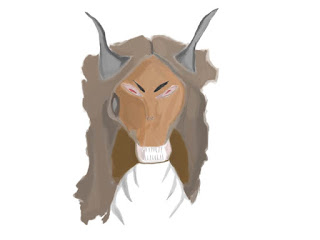
This is my final creature pieces this is one add the effect of light to give it that aspect of 3d and to give the creature shell a reflexed shine effect.
My lighting plan has given the effect of a bright glow that happen the light hits the creature shell to give it a shine which it has achieved.if i could developed this again i would add the ray of light.
end of creature project evaluation
In the creature project i used both digital and tradition drawing in this project our first 2 piece of work i used Photoshop to create silhouettes of 10 different creature by drawing shape until a shape of creature appeared and i also used to create creature by cutting out different shape out of images to form a body of creature.the image i cut were used to represent the skins of a creature, i attache cut image into one whole body until i felt confident enough to call it a creature.
I prefer to use Photoshop rather that tradition drawing because it has more tool and technique like the blending technique were i blend to different colours together to stop going over each other and i used the eraser tool to remove any mistake. In my creature design i use digital paint from Photoshop to first place the main colour of the creature in the correct place after that i had to blend the colour together to make it look more real. Then i use the digital paint to give it the effect of light hitting my creature to make it look for 3d and real.
for my collage i first selected a image from google which could be used as the creature skin, i then pasted it into Photoshop. After that i then used the lasso tool to cut out shape that represents the shape of a creature then i cut out other smaller parts to be used a the creature features.
My idea experiments help come with the body of my creature and type of creature which help consider what feature to add to my creature
I have learn't a lot of Photoshop technical skills such as using a soft brush on low opacity to blend to different colours together to make it look more neat. Plus i use a grid in Photoshop to help draw 2d picture much easily.
The way i did my final creature is first i used the picture i took of my observation drawing of my creature and i sketch out the outline such as the face , eyes and shell from my observation drawing. after that i used a hard paint brush to add the main colour of the creature which was a brown face and very light grey for the shell , plus a dark brown patch on the side of it mouth. then i added feature such as the horn which was a grey and the eyes which used white , red , pink and soft brush to make. The eyes socket need the a hard brush of white and soft brush pink, but the the eyes ball needed red plus small struck of yellow to add detail to the eyes. Soon i after i realised i could do a proper nose using the outline so used shading to add the nose. By adding a small shadow to indicate something is there, i also used light to give my creature by giving a shine on the creature shell to show that it is a hard object also to give it that 3d effect by adding shadow. Further i then start with the mouth first by add a hard coat of pink to inner moth then making it dark, even more dark at the back. Plus the teeth has a grey done by a hard brush.
The artist i was mostly influence by was long Ouyang because he use feature that fit well with what he was going for, plus he used a many colour for section and used the light to give it the effect of depth to show it three dimension.
If that my creature art style is realism because the shading and light give it that look that it is in the real world. Plus i believe my creature goes well with a fantasy RPG game mainly sic-fi.
I used measurements accuracy draw a 3d object with the at the correct size like the grid method but that is used in 2d picture. The measurements is done by moving your pencil with thumb and then find out how many units the object takes both horizontally and vertically. Then you keep your arm straight , rest you head on your shoulder and then place the tip of you pencil on a certain point and place your thumb to make a measuring point. In which your use to to creature a cross with point to use as measuring, this is a very effect way of keep 3d object the correct size to stop it look odd.
On my creature i used light to give show the texture of my creature by add a shine on the shell of the creature to show that part of it is hard. The light source i used in my work was a Jim ferria style were he used one main light source to highlight the main part for me it was my creature face and shell. on my object it show it gave the effect that the bottle was the main thing to focus on. Using light show that the drawing is not a flat 2d but is has a depth and tone and that it is 3d.
I feel that my work being communicated can be a good portfolio for when i go to apply for a job and i can used it refresh my memory on certain work in the further.

Comments
Post a Comment